Recent Post
Archive
- July 2024
- June 2024
- May 2024

Understanding The Role of The Printer Fixing Assembly in Your Home or Office Printer
Salman Faris
Mar 04, 2024
What is a printer fixing assembly?
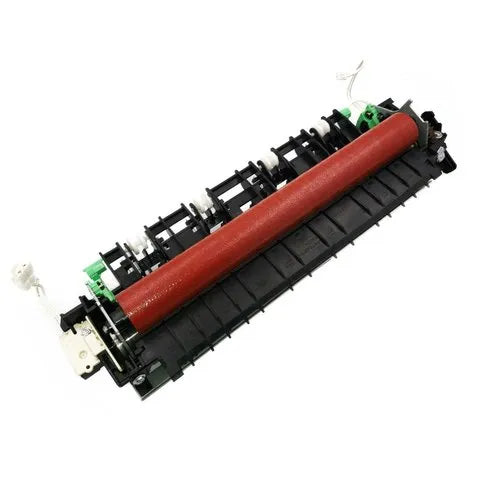
The printer fixing assembly is a crucial component of your printer that is responsible for fusing the toner onto the paper. It consists of a heating element and a pressure roller that work together to melt the toner and bond it to the paper. If this assembly is not functioning properly, it can result in smudged or incomplete prints. Regular maintenance and timely replacement of worn-out parts can ensure the smooth operation of your printer and maintain print quality.

Importance of the printer fixing assembly
The printer fixing assembly is a crucial component in ensuring your printer operates smoothly. It is responsible for heating the toner particles and fusing them to the paper, creating high-quality prints. Without a properly functioning fixing assembly, your printer may produce smudged, faded, or incomplete prints. Regular maintenance and timely replacement of the fixing assembly is essential to avoid print quality issues. The fixing assembly directly impacts the overall printing performance of your printer, making it imperative to keep it in top condition.
Common issues with printer fixing assembly
Printer fixing assembly, also known as the fuser unit, is a vital part of your printer. Here are some common issues you may encounter with the printer fixing assembly:
- Paper jams: If the fuser rollers are worn out or dirty, it can cause paper jams.
- Smudged or wrinkled prints: A malfunctioning fuser may result in smudged or wrinkled prints.
- Overheating: If the fuser unit overheats, it can lead to print quality problems and even damage the printer.
Understanding these common issues can help you identify and address problems with your printer's fixing assembly effectively.
Signs of a malfunctioning printer fixing assembly
If your printer is leaving black spots, streaks, or smudges on your printed documents, it might be a sign that your printer's fixing assembly is malfunctioning. Additionally, if you notice that your prints are coming out wrinkled or creased, or if the printer is making unusual noises during the printing process, it could indicate a problem with the fixing assembly. Regular maintenance and cleaning can help prevent issues with the fixing assembly and extend the life of your printer. Keep an eye out for these signs to catch any problems early and avoid potential costly repairs.
DIY troubleshooting for printer fixing assembly problems
If your printer's fixing assembly is causing issues, there are some troubleshooting steps you can try on your own before calling for professional help. Here are a few tips to help you with DIY troubleshooting for printer fixing assembly problems:
- Check for Paper Jams: Open the printer and inspect the fixing assembly area for any stuck or jammed paper.
- Clean the Fixing Assembly: Dust and debris can accumulate in the fixing assembly and cause problems. Gently clean the area to remove any build-up.
- Reset the Printer: Sometimes, a simple reset can resolve fixing assembly issues. Turn off the printer, unplug it from the power source, and wait a few minutes before plugging it back in and turning it on again.
- Ensure Proper Installation: If you've recently installed a new fixing assembly, double-check that it has been properly installed according to the manufacturer's instructions.
- Update Printer Drivers: Outdated printer drivers can sometimes lead to fixing assembly problems. Check for available updates and install them if necessary.
Taking these steps can sometimes resolve common fixing assembly issues and get your printer back up and running smoothly.
When to seek professional help for printer fixing assembly issues
If your printer is consistently jamming or producing poor print quality, it's time to seek professional help for your printer fixing assembly. When you encounter issues such as strange noises, paper not feeding properly, or a fuser error message, it's best to consult a professional. Additionally, if you notice a visible damage or wear on the fixing assembly components, it's crucial to seek professional assistance to prevent further damage to your printer.
Repairing or replacing the printer fixing assembly
If your printer is having issues, you might be wondering if you need to repair or replace the printer fixing assembly. This assembly is responsible for heating the toner and fusing it onto the paper, so it's a crucial part of the printing process. Here are some things to consider when deciding what to do:
- Signs of wear: Check for any visible signs of wear or damage on the fixing assembly, such as cracks, broken parts, or excessive toner buildup.
- Print quality: If your prints are coming out with smudges, streaks, or smears, it could be a sign that the fixing assembly needs attention.
- Cost of repair vs. replacement: Consider the cost of repairing the fixing assembly versus the cost of replacing it. Sometimes, a repair may be a more cost-effective option, but other times, it may be better to invest in a new assembly.
Remember, it's essential to consult a professional if you're unsure about how to proceed with the fixing assembly in your printer.
Cost considerations for fixing a printer assembly
Printer assemblies can be costly to fix, and the expense will depend on factors such as the type of printer, the brand, and the complexity of the issue. According to Printer Repair Depot, the cost of fixing a printer assembly can range from $100 to $500. Keep in mind that this estimate may vary based on your location and the expertise of the technician. Additionally, it's important to consider whether it may be more cost-effective to replace the entire printer if the fixing assembly is significantly damaged.
Maintenance tips for prolonging the lifespan of the printer fixing assembly
Regularly clean the printer fixing assembly to prevent dust and debris from compromising its performance. Use a soft cloth to gently wipe the assembly and a small vacuum to remove any accumulated debris. Additionally, avoid overloading the printer to reduce wear and tear on the fixing assembly. Lastly, schedule periodic maintenance checks with a professional to ensure the printer fixing assembly is in good condition.
Conclusion: optimizing the performance of your printer fixing assembly
To optimize the performance of your printer fixing assembly, consider the following tips:
- Regular Maintenance: Clean the printer fixing assembly regularly to prevent dust buildup and maintain optimal printing quality.
- Use Genuine Parts: When replacing any components of the printer fixing assembly, use genuine parts to ensure compatibility and longevity.
- Monitor Print Quality: Keep an eye on print quality and address any issues promptly to prevent further damage to the printer fixing assembly.
- Professional Inspection: If you notice any unusual noises or performance issues, seek professional inspection to prevent any major breakdowns.
By following these simple steps, you can ensure that your printer fixing assembly operates at its best, providing high-quality prints and extending the lifespan of your printer.
← Older Post Newer Post →


